Virus surgery: Re-Potting 101 (warning - many photos!)
3.7mb worth of pictures loading up, might take a while. (Will take approx: 2 Mbps = 15 secs; 512 Kbps = 1 minute; 56k dialup = 9 mins).
Virus Surgery: Re-Potting masterclass! A few may recall I had a few wobbly pots (pot = potentiometer, or to the layman, a knob) on my Indigo when originally purchased second-hand. They worked perfectly fine, but they happened to wiggle around slightly from side-to-side when touched. On closer inspection, it appeared the metal shafts on the pots affected had worked loose, quite possibly due to a bump when in transit. So I decided to install new ones. All pots are 10Kohm linear, but I could not manage to source the knobs from local electronics stores/catalogues. They may be custom to Access. I therefore managed to acquire four new pots from Access-Music's hardware branch [Synthesizer Service] which is based in Germany. So here we go!:- Disclaimer (purely to cover my own ass):- It'll void your warranty if you do it yourself, so if you don't trust the Virus in your hands get a proper, qualified serviceman to do it for you.  ^ My Indigo under anaesthesia. 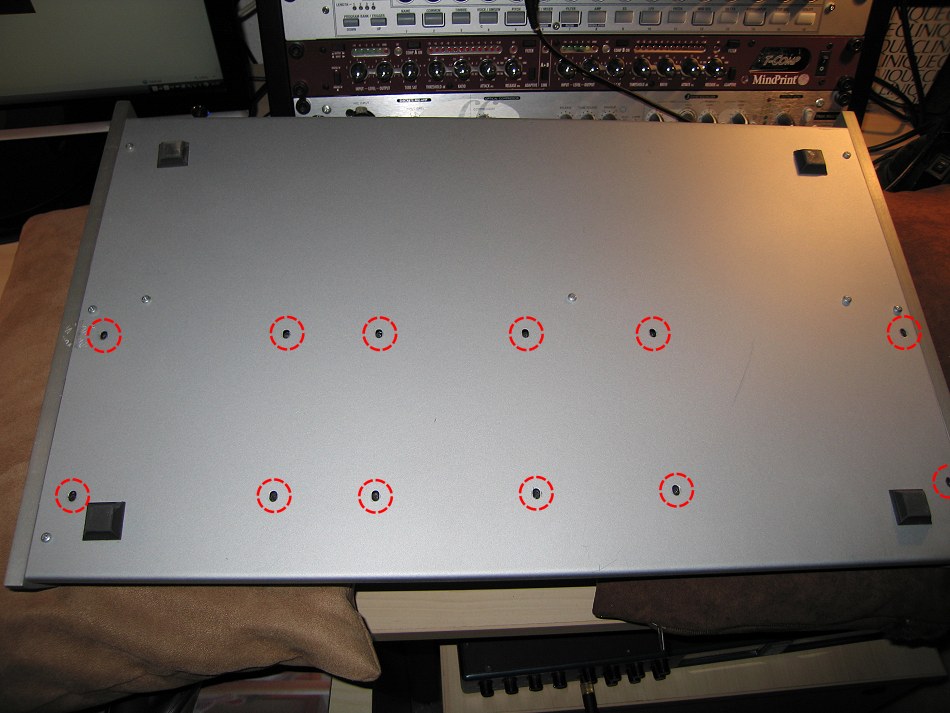 ^ Turned over, all highlighted screws need to be removed. 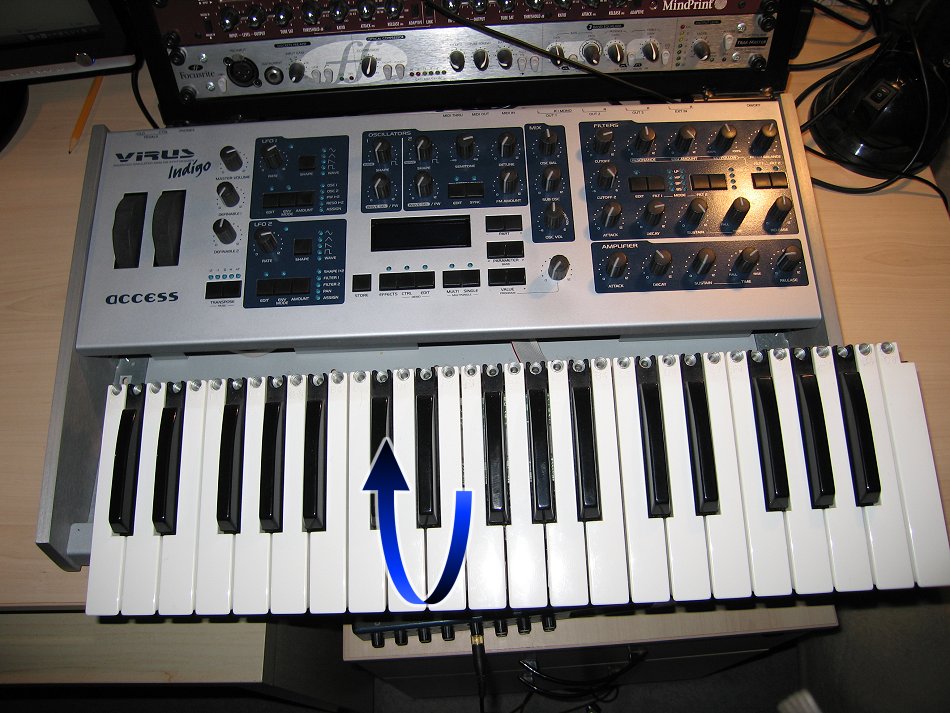 ^ Turned over again. The keybed now slips out! 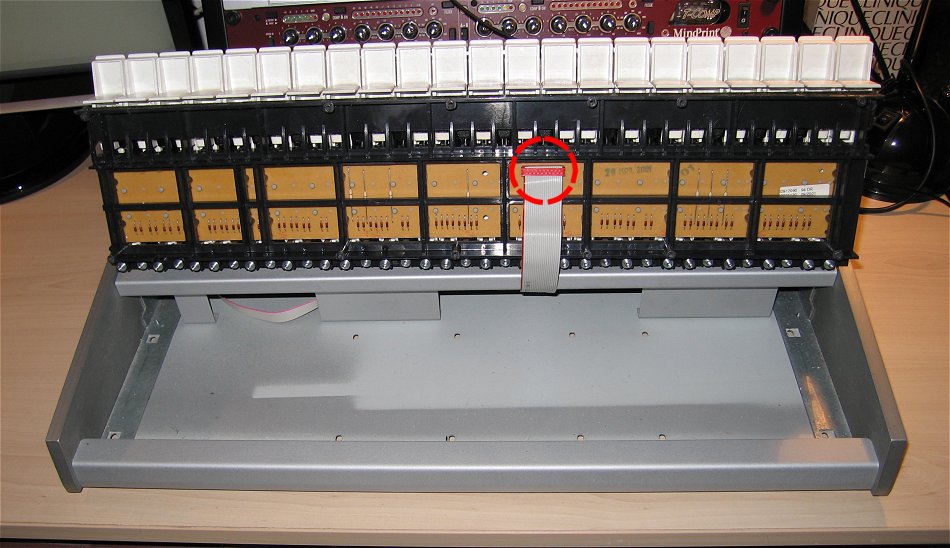 ^ The keybed is still attached via a ribbon cable, shown highlighted, so this needs to be disconnected. 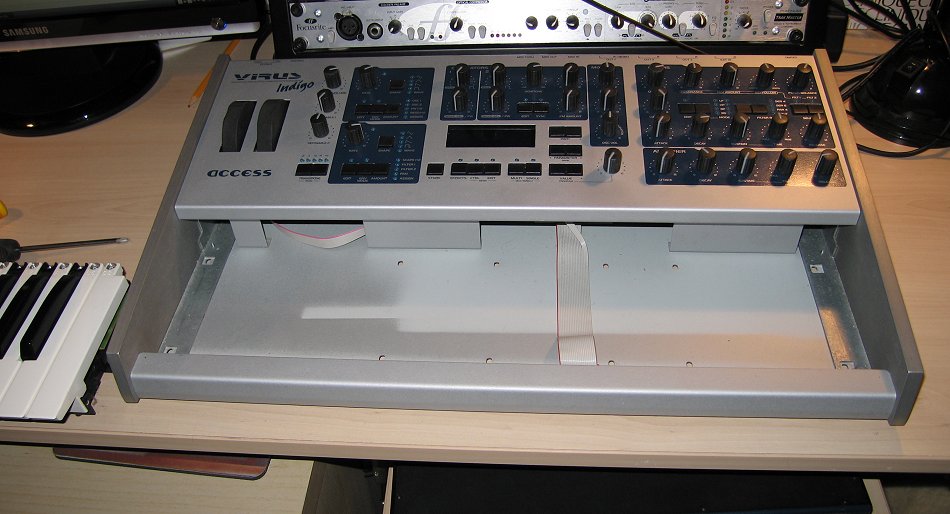 ^ Indigo sans keybed. 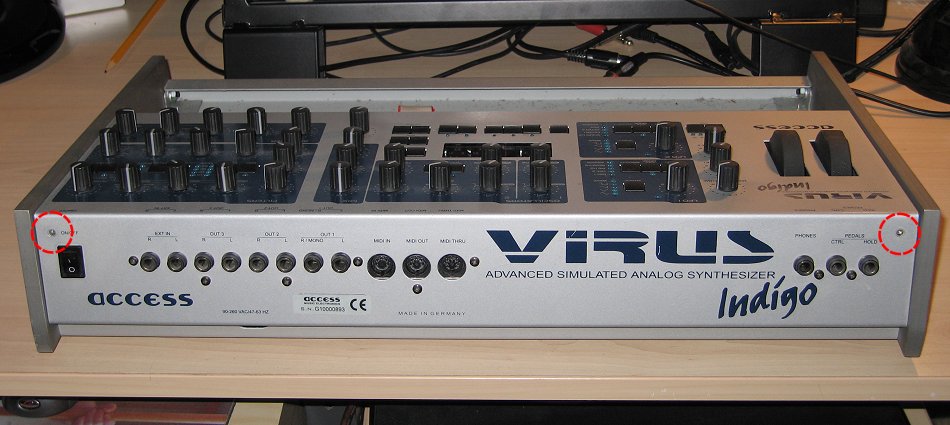 ^ Two screws either side of the rear panel need to be removed. 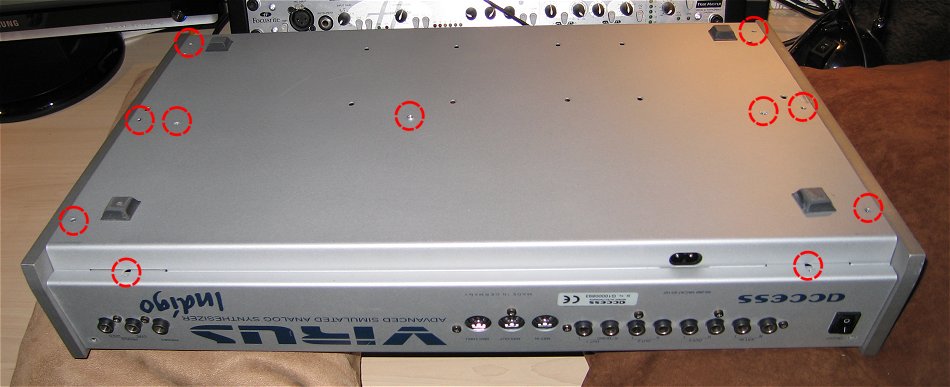 ^ Turned over gently. All highlighted screws need to be removed. 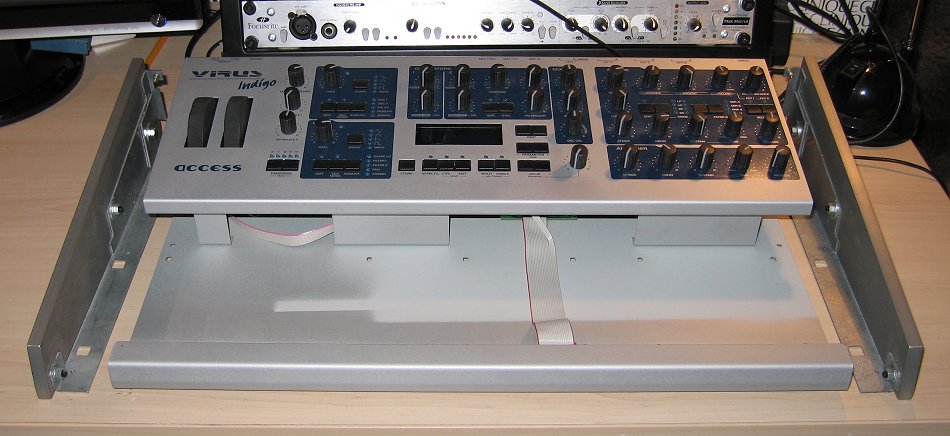 ^ Turned over very carefully. The two side-cheeks now slide out either side and can be removed. 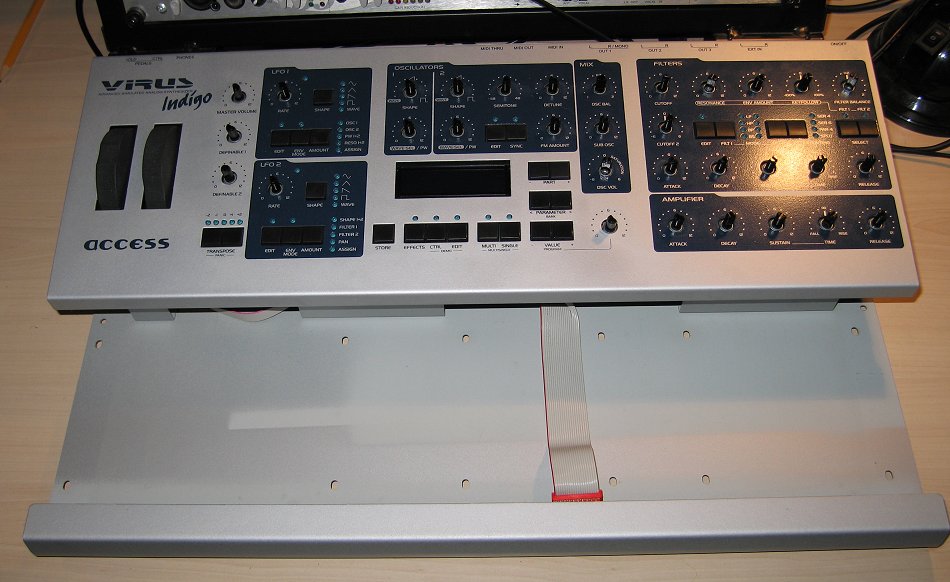 ^ Indigo without keybed and side cheeks.  ^ By removing the previous screws, the front fascia is also separated from the chassis. You can lift it off. Continued... |
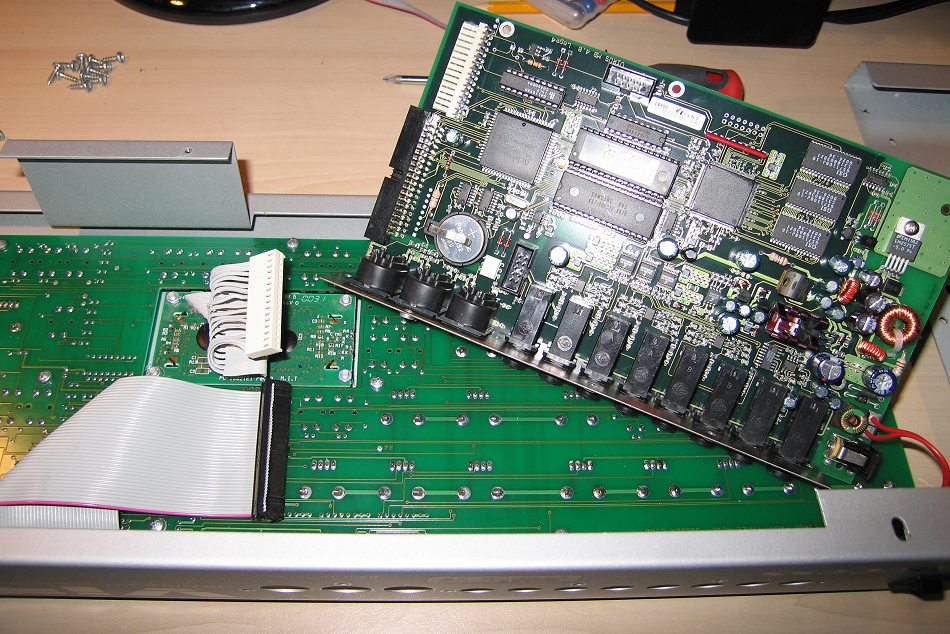
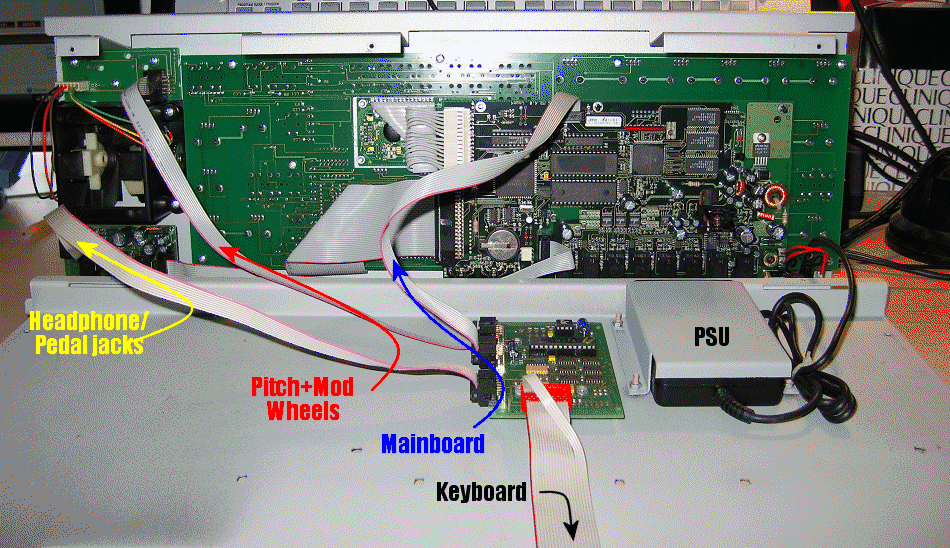 ^ Above shows the all ribbon cables and their use. The mainboard, pitch+mod wheels, and headphone ribbon cables all need to be labelled, well I did anyway in case I forgot which is which (three cables are identical), and then disconnected. 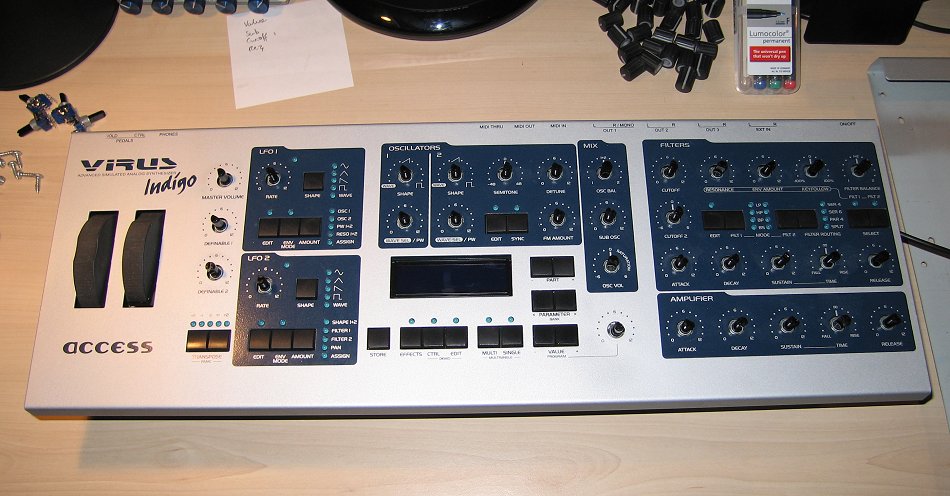 ^ The front fascia on its own. All the circuitry is behind this. It's effectively a Virus B Desktop! You could make your own chassis and end-cheeks if you wanted. I digress. All the rubber knobs need to be removed - they can be simply pulled off (as shown above). 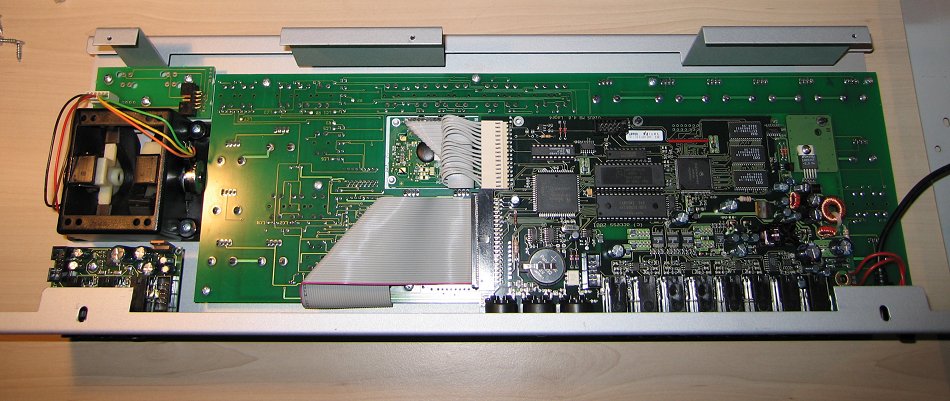 ^ The front fascia flipped over, showing all the circuitry. On the bottom right are all the rear analogue output jack sockets. On the far left are the pitch+mod wheels. 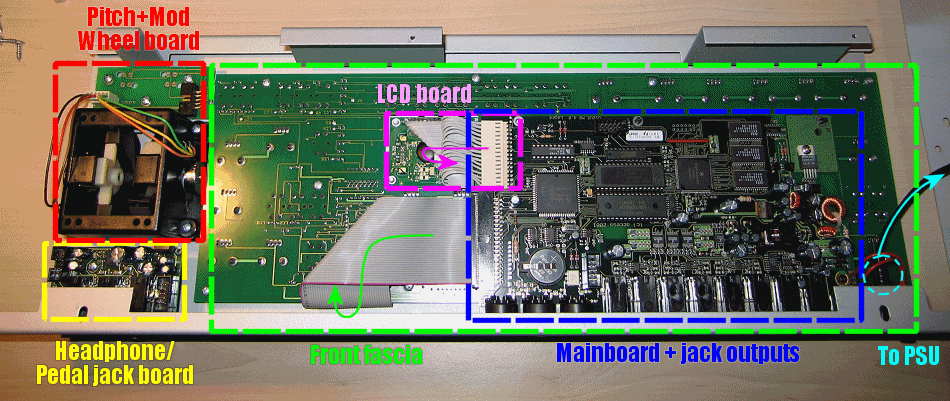 ^ The same photo, but labelled using respective colours. The 'mainboard' piggy-backs onto the 'front panel fascia board' (where the knobs are), so in order to get to the underside of the knobs on the fascia board (to de-solder and re-solder them) it will be necessary to take the mainboard off. 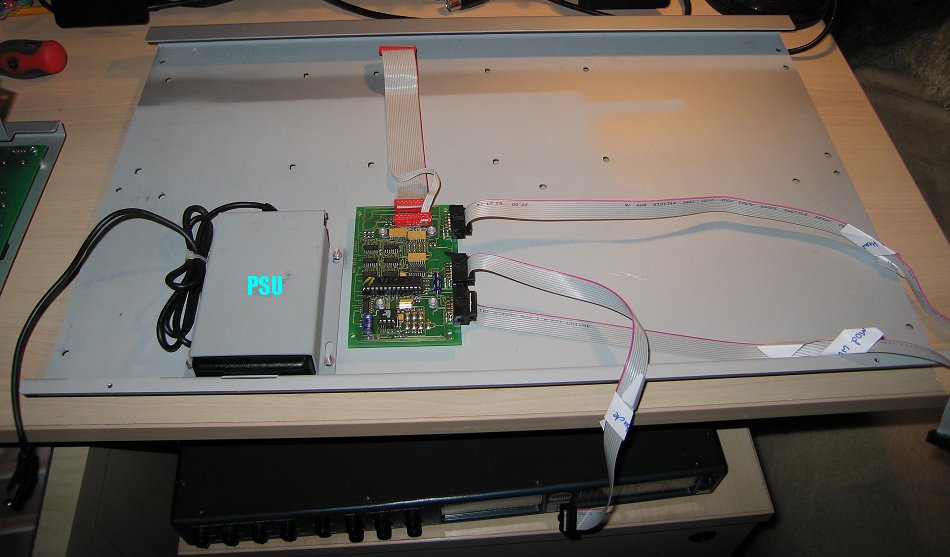 ^ This is all that remains of the (now separated) chassis itself. You can see the PSU, and the ribbon cable controller board. 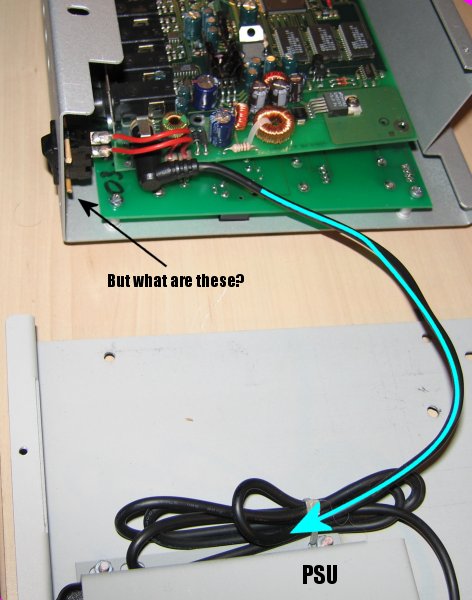 ^ The PSU still needs to be disconnected from the main fascia and mainboard circuitry, but what's this?  ^ Seems the on/off rocker switch was slightly loose so either Access-Music or the former owner used two wooden toothpicks (I'd actually removed one in that photo) to wedge open the retaining clips of the switch more securely to the chassis. Is this done by Access and commonplace on all Indigos, one asks? 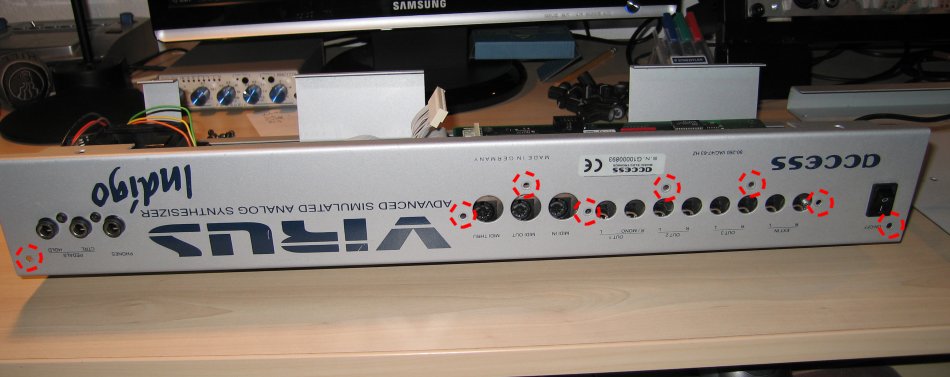 ^ Looking at the rear panel. All the highlighted screws are to be removed.... 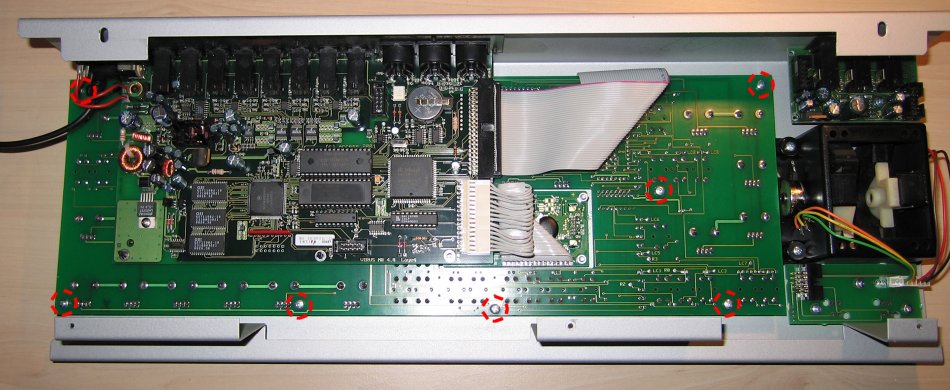 ^ .... followed by the screws on the front-panel fascia board itself. 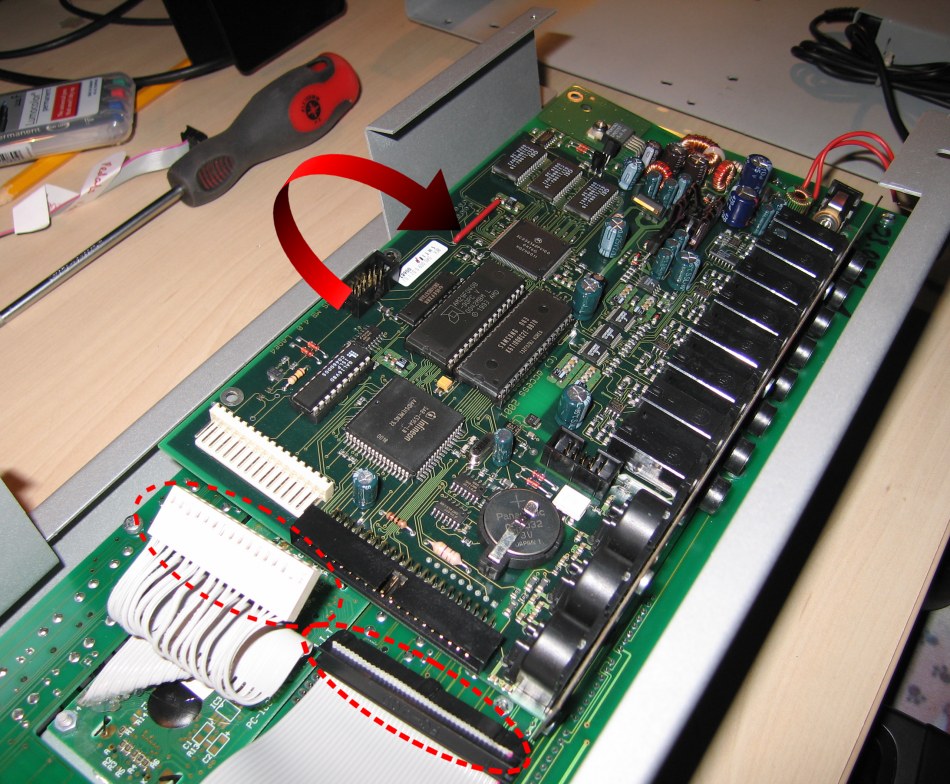 ^ After disconnecting the two ribbon cables (separating the mainboard from both the front panel and LCD), the mainboard can eased off of the standoffs and lifted away. Continued... |
 ^ ... which reveals the front panel fascia board underneath it. 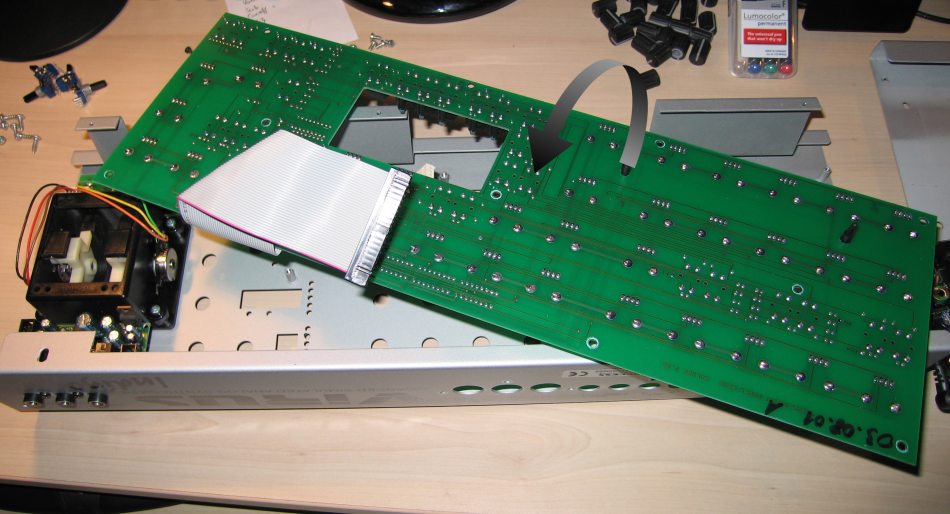 ^ The front panel fascia board can now be lifted out. 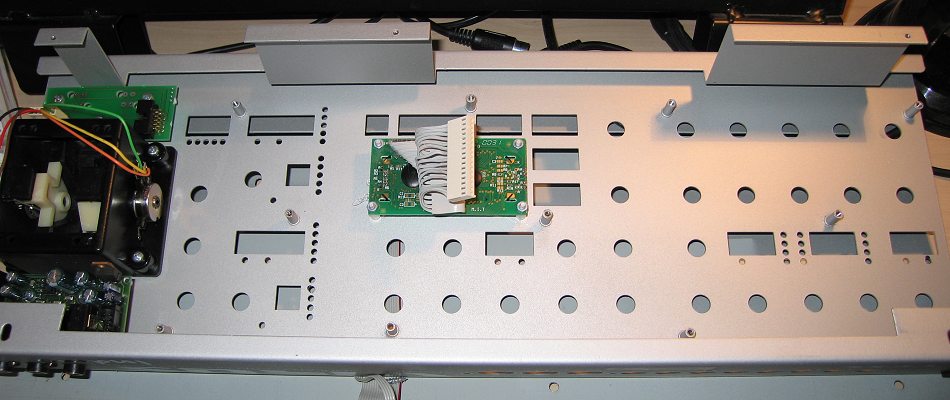 ^ ... which leaves a nearly bare front panel (LCD shown in the middle, and Pitch/Mod wheels to the left). 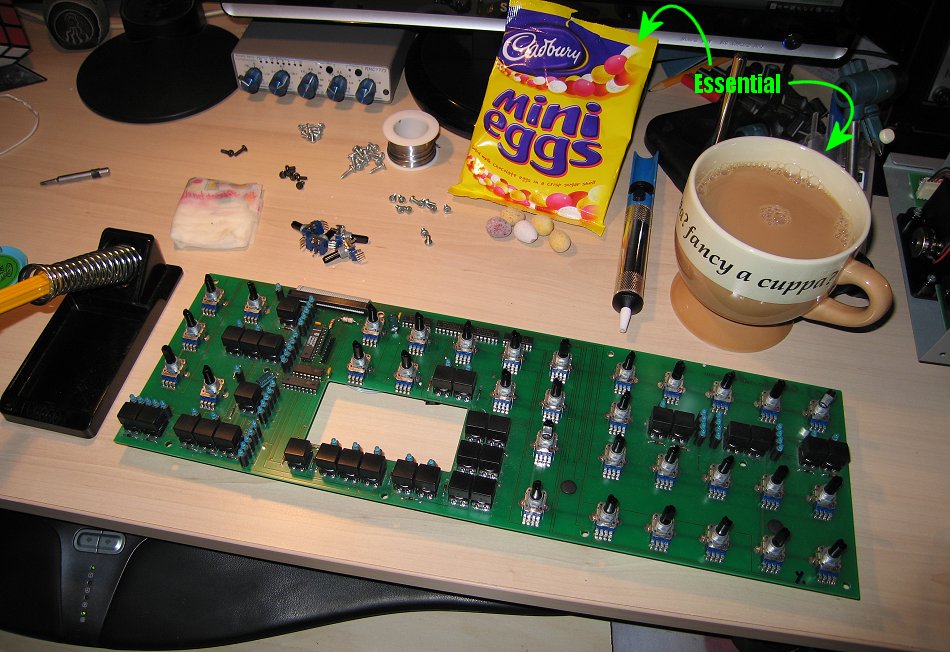 ^ So we finally have full access to the front panel board! You will need (from the left): * Low-wattage soldering iron, with a fine tip. * Wet sponge/paper for cleaning the iron * New pots * Solder (not too bulky/thick) * A bag of chocolate mini-eggs * Solder-sucker * A bucket of tea. * Wire cutters or similar (not shown) 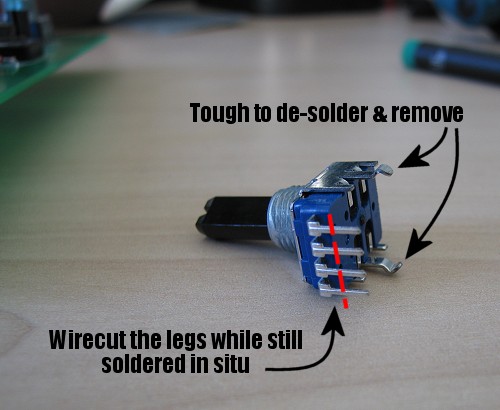 ^ If you look at one of the new pots, you can see it has six legs. The hardest part in removing the old pots are the two main large legs that have kinks in them, they grasp the board holding them firmly in place in addition to being soldered in. So 1) it's harder to get all the solder out when de-soldering it (you have to suck the solder out both the bottom and top), and 2) you have to have nerves of steel when it comes to prizing the pot out. 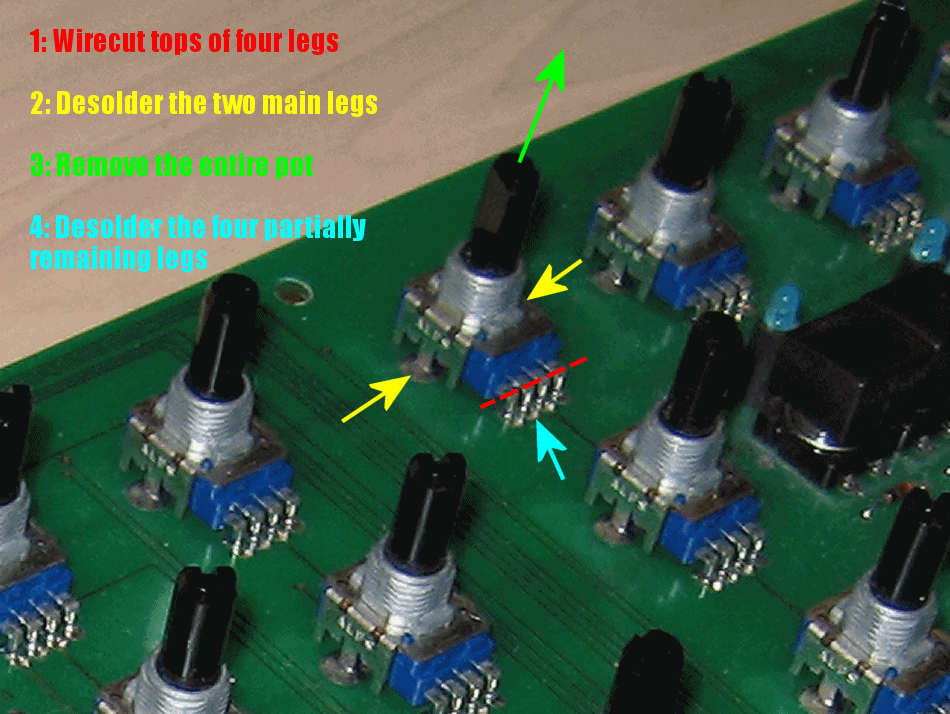 ^ Regards the four legs, I found it easiest just to use a wire cutter to cut the tops of them (shown on dotted red line) while still in situ (soldered in). Had to take great care as the wire-cutters are a little bulky and could easily scrape the board while cutting the legs off if you weren't careful. After that, de-soldered the two main legs (highlighted in yellow) using a soldering iron and solder sucker. Be careful you don't inadvertently touch the barrel of the soldering iron onto the Virus buttons or the shafts of neighbouring pots (they melt very quick! Luckily it was just a nick.) whilst de-soldering. Then had to wiggle the pot(s) out of the board, which is the most frustrating part. Once the pots are out, you can simply remove the four partially remaning legs on the board via the soldering iron and sucker. Just heat them briefly, they come out really easily. Use the solder sucker to remove any solder left behind. 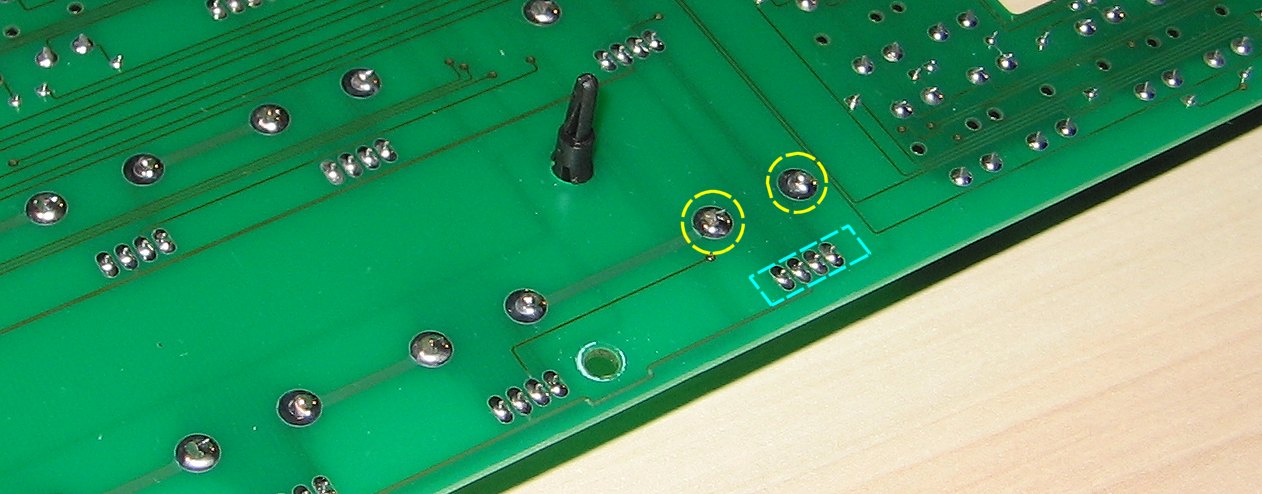 ^ Shows the other side of the board showing the 'footprint' of a pot before de-soldering. Two main tricky legs circled in yellow, with the four other legs circled in blue. 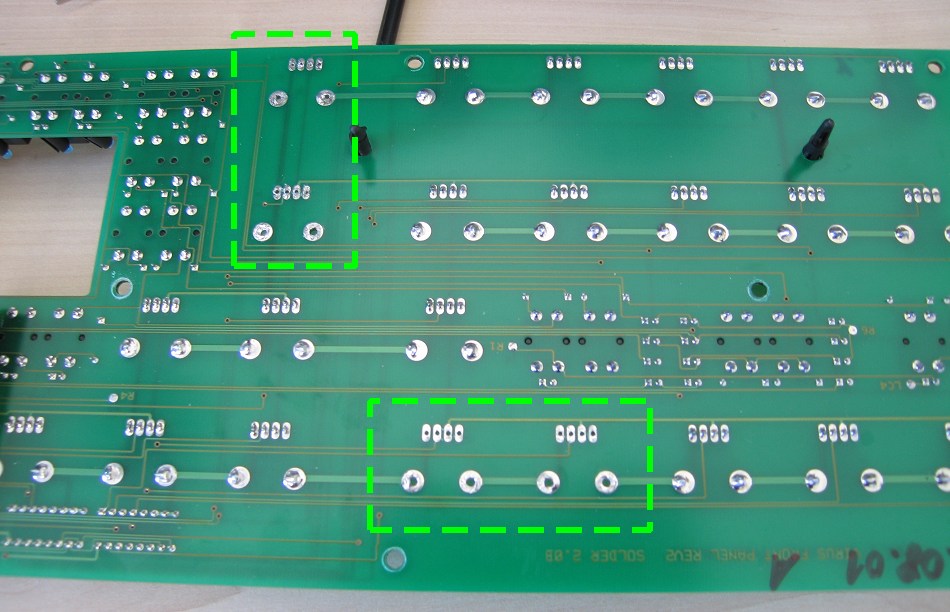 ^ In my case I had to remove four wobbly pots - which are shown removed. 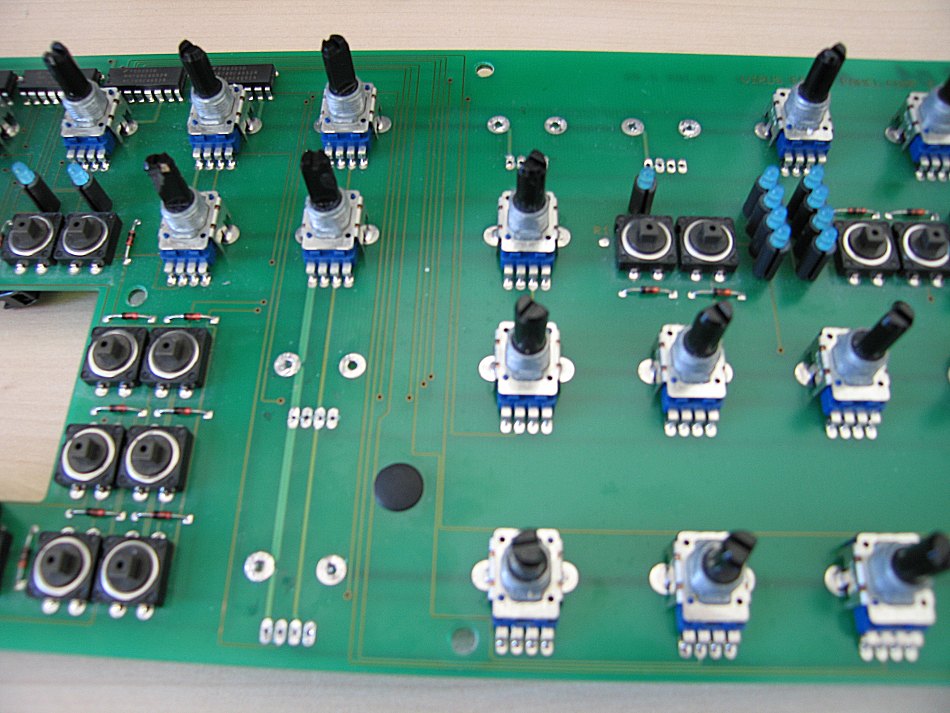 ^ From the other side (I'd removed the buttons by that point, in case I touched any others with the iron by accident! They easily flick out by gently levering them.). Found soldering the new pots into the board a doddle ONLY if the holes on the board are neatly de-soldered and maximised beforehand. It's a pain otherwise, as the new pot and all of its six legs need to be properly inserted before you start actually soldering them in place. 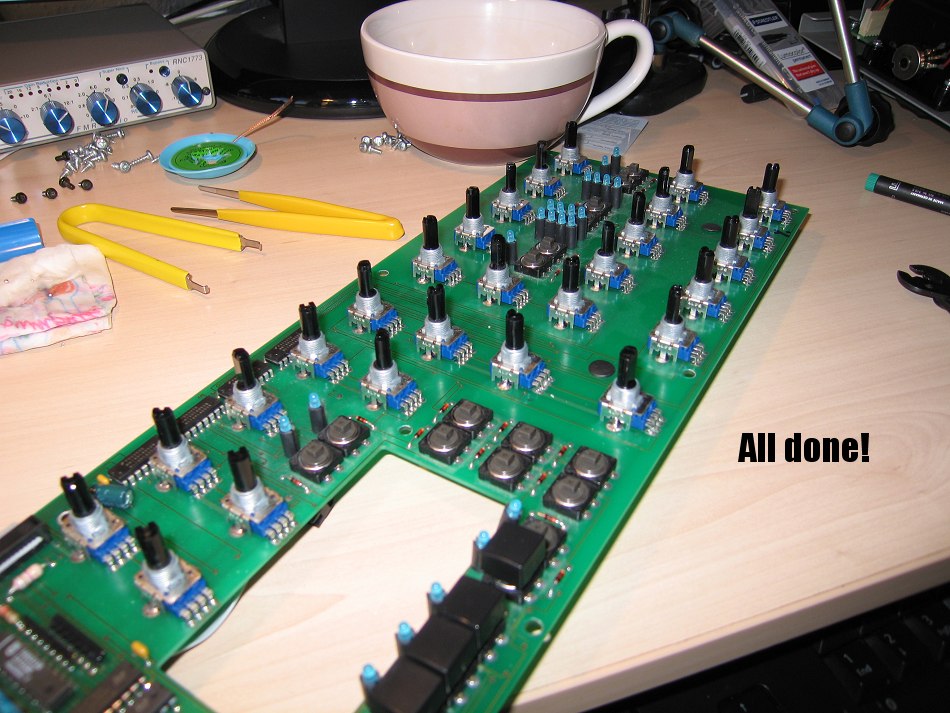 ^ All pots in place and soldered! |
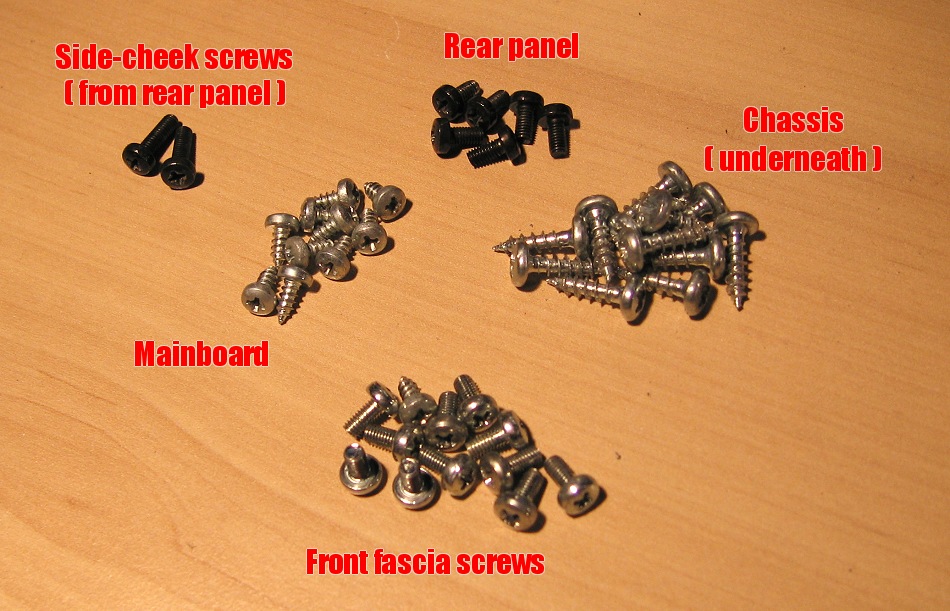 ^ The wealth of screws needed to put the Virus back together. Found it essential to label them as they're all different. 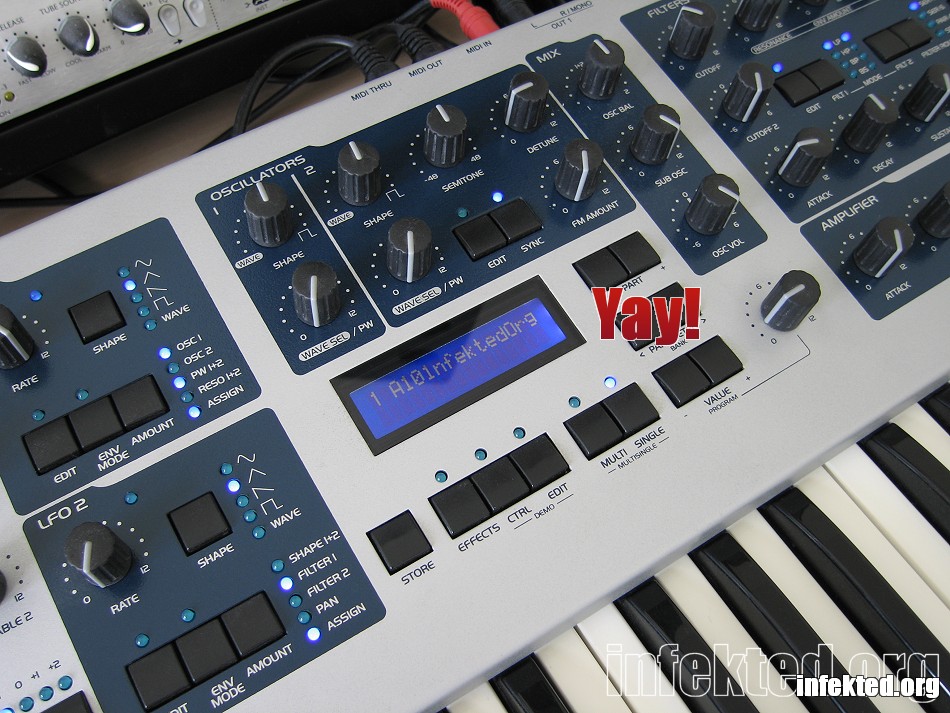 ^ Operation complete. :) |
Kudos, you're a better man than I! My TI Polar is back with Andertons after i found a screw rattling around inside! I miss her! :(
Well done, quality post. (^_^) |
Thanks for the very detailed step by step project pictures. I've dove into a few synths, but dont know if I would have the guts to rip a Virus down to its molecular level like you! Bravo!
Now I guess it goes on ebay with the "this synth is like brand new!", "very low usage!", "never giged with!", "I'm not much of keyboard player!", "still has factory presets!", "i think it has 64 voices, you would know better than me?!", "used on only 2 projects than sat in my studio unused!", "selling for a friend because he doesnt know how to use it!" description! ;) |
Quote:
|
awesome post Timo.
Glad the mini eggs were able to see you through :) |
Excellent repair coverage! Thanks a lot Timo. It looks like apart from wooden sticks :grin: virus is very well designed compared to some other devices I have had a chance to see disassembled.
|
oh man...thats a lot of work for some knobs, but nice
|
seeing that beverage so close gave me cold sweat
|
Quote:
Yeah I almost had Kittens. I have a few shaky pots on my TI desktop and could do with taking it apart and replacing them but have neither the skill to solder or the bawz to dismantle my synth. If I ever grow a pair, I will defo use your fotos for reference Timo, cheers ;) |
Oh and almost forgot. Replacement pots??? Access I'm (ass)uming???
|
Quote:
Sorry, just re-read the OP and you've even provided me with a link, humblest apolioligises. :oops: |
WOW.......:cool:
|
wow...what the hell were those tooth piks doing in there ??
very strange... i wonder if all indigos had that ?? |
They put those in there just in case you have a bag of mini eggs near by.:D
|
Awesome write up! I started with an Indigo for my first access synth, what a great machine that was. Traded for the Ti Polar and been super happy. :grin:
|
Toothpicks are what give the Virus that analog character :mrgreen:
Yoo knowz I iz right! ________ Aerospace |
Great post very interesting.
|
Quote:
lolz |
Top surgery master-class... !!!!!
Timo, you must be german, right? :o |
Quote:
|
Has anyone been able to match up the Pots to anything in the Mouser/Digikey catalogs?
|
Nice one, it's always interesting to see whats under the hood. Mind you , only 1 bag of mini eggs? Mmmmmm need more than one lol
|
what is the model number of the alps pot?
I think these are the same ones in the virus ti? looking for a usa source preferably here in california? tia |
i need a usa source preferably here in california
|
I just bought an Indigo with this problem. The previous owner had been going to fix it, but decided to sell it instead. He had already communicates with Access and they had invoices him- and the part number is on the invoice. The part number on that invoice is RK11K1140A23 which appears to be a standard part available through Mouser.
This thread should be stickied. |
Regarding those toothpicks...I would not be in any way surprised if it came that way from Access. I had to send my BRAND NEW virus ti back 5 times before I got one that *kind of* worked. Pitch bend and mod wheel are still flakey, so I just disconnected them.
|
About the pots...
Here was my original thread, when I was trying to find the pots used (before contacting Access' hardware branch to obtain them). http://infekted.org/virus/showthread.php?t=24791 http://SynthesizerService.de stated the pots are 10K Ohm linear. These are easy to find, but ones with the same spindle dimensions as the Virus uses are not. The Virus pots have spindles that are exceptionally short. 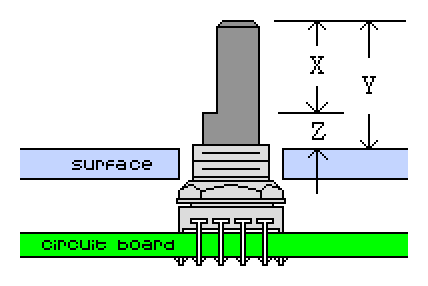 Above shows the measurements of a general potentiometer spindle. However, for the Virus, the 'Z' measurement is 0mm (it sits flush with the top of the nut), and the 'Y' measurement is much smaller than usual. So an off-the-shelf 6-legged, 10KOhm vertical pot like this, for example...  ... (the one on the right), or the one you pointed to in Mouser (well, at least the graphic of it), wouldn't be any good, as the knob would be sticking out by a mile. At the same time you don't want the 'Y' measurement to be too small, or the bottom of the rubber knob will chafe the surface. |
Sir Timo-
Very cool! Your attentiveness to detail and seeing the reversed alien technology under the hood is very nice! Also, being that coffee is my drug of choice on this planet, that uber cup of java sitting there makes me very uneasey, not having a surgeons hands and learning from past disasters; I no longer 'allow' myself to have liquids in my immediate work area..no, no! My question is--where is the almost obligatory 'Studio Cat' that one sees in 85% of synth-based studio pictures? Or that just a quirky USA thing? :-) Cats give one a 'Free Envelope', mine providing an alto-sine-based-variable attack and release, depending on mood! |
Also forgot, you also need a pot which has the spindle in the correct orientation.
In the Virus' case, the 'flat' bit of the spindle is on the opposite side to where the knob's marker is on the outside.  Quote:
Turning into a coffee head myself! Got an espresso machine which I'm slowly learning to use. Tea's a great no-fuss all purpose working man's drink though. :) Quote:
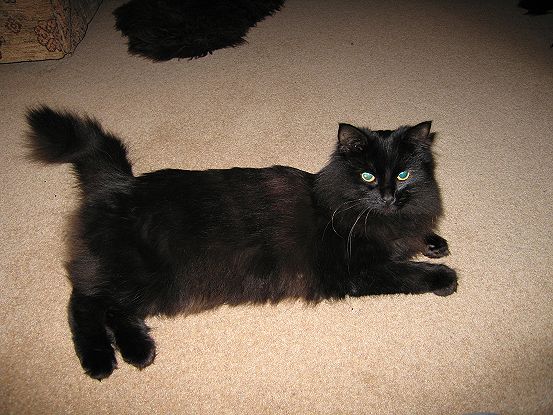 She tries to jump up and walk on my mixer and keyboards when I'm not looking. Either that or she blocks the computer monitor and sticks her bum in my face when I'm trying to type, or tries to stamp all over my computer keyboard. Blah. Otherwise currently pet-less. Had three dogs in the past, though. :) I digress... |
You just gave me GREAT idea! That "ground-loop" that usually ends with an xmorph of filter to extreme high pass and very "liquid" turn of the frequency and resonance!! Would be great to be able to sample that and run through filter matrice! ;-p
"maya" respects the machines, it's the irresistable dangling of the headphone cord that may activate extreme 23 pound pouncing! He looks very similar to your bro's cat but his 23 LB self always makes the file size too big to post! Ha~! Was it meticulous or easy lining-up all those blue LED's upon placing all togther and making sure all aligned or are they all made to sit rigid and not move out of line? |
23lbs?! Ya need to get him on a treadmill! lol.
Quote:
|
I love the build-quality on Access AND Waldorf Synths (the Microwave XT and Waldorf Q Rack are literally built like military specification and could easily be used as a boat anchor, only of course if the synths were beyond repair)....the German build quality is quite impressive and leaves the Asia-Pacific Synth Companie's plastic, casio build quality in the dust!!
My studio cat is NOT FAT, he is a breed that are known for their larger size and have reputational name of being "the gentle giants of cats"...Maine Coone Cats. They also are incredibly smart and all four paws are webbed---he drinks water by cupping his paw in water up to mouth!! He is actually assumed the role of being a therapy animal as I am a recently disabled USA Military Veteran and literally gets my attention to follow him where medications are kept three times a day to remind me...he also lays upside down below my Virus B and Waldorf Blofeld Black keyboard two tier when I am playing or sound tweaking...think he likes the synths!! HA! Do an internet search on that breed as he is of normal size and stature for a male....my mother calls him the black panther...lol! back to topic: I wanted to thank you for posting part numbers for encoders/pots as that could be very helpful in future but not even a mile from me is an electronics authorized repair place for many synth brands and if should need anything such as your endeavor with both Virii out of warranty, would probably just go there after sysex dump back-up of sounds. Very cool pics! Robert |
Quote:
 Mouser's site even says that the image is for reference only,, that you have to refer to the specs. Looking at the specs gives you a 3d PDF of the actual item  which as you can see has a much shorter shaft. Personally, I'd rather take the chance with ordering these from Mouser, than have to pay shipping (possibly from Germany) and pay for a wire transfer or bank draft on top of that... Access, if you're reading this, you know that there is a credit card reader available for the iPad, right? :/ |
Yeah, the USA banks have become greedy thieves in at least my bank would charge minimum $20. just for a wire transfer, which is insane since it's all the same zeros and ones/binary. The iPad cc reader has made it really easy for we visual artists at an arts fest to accept cc without having to buy/rent a cc machine or pay crazy fees. Surprised Access does not help out the International market they criss cross!
|
Quote:
Only $20? that means its only gone up $5 in 11 years... |
Quote:
|
1 Attachment(s)
I'm not sure if any of you guys care, but I've solved the shaky pot problem without having to replace any pots at all with some strategically placed JB weld. the crazy glue fix that was mentioned pages ago was one I tried first a few years back and it worked pretty well for the hardly loose pots, but the looser ones loosened up after a year or so of use. I would prefer replacing the pots entirely, but I don't feel like spending $30 on pots only to find out that they don't fit right.
for the record, it was a shitty engineering choice on access' part to have the pots free standing like that, they are designed for the centre post to be screwed down with a washer and a nut on the faceplate so that they don't do what they seem to all do (ie. wear out). anyhow, I'll take some pics of my jbwelded pots in case another person happens to land on this page with the same problem (hi, person from the future!). on an unrelated note, I mailed access a while back looking for a knob and pots to buy, but they didn't have anything in stock so they took my name and address. a few months later, five free knobs and some stickers showed up in my mailbox, but no go on the pots themselves. next time I do a mousr order, I'll throw in one of those pots and let you guys know how they compare to the stock ones. /studiocat |
| All times are GMT. The time now is 10:56 AM. |
Powered by vBulletin® Version 3.6.4
Copyright ©2000 - 2024, Jelsoft Enterprises Ltd.
Copyright ©2002-2022, Infekted.org