:p Nice studio cat picture! Luckily, I have not had any issues with either a KB or KC and will ask if anyone knows if Access used same 'free-standing pots' as on the Indigo the KB and KC?
I ask because did they not place a keyboard either without after touch or less responsiveness on Indigo? Wondering if so, did they use same 'free standing pots' up to the Ti2 Polar? Were Access engineers depending on the holes in keyboard fascia to maintain center axis stability? For what it's worth, learned from my military career, where indeed had sensitive nuclear security equipment that had tons of knobs to twiddle and very precise numerical combinations required; we were taught to turn/treat *any* potentiometer with respect to the axis they are all mounted on, no matter the configuration. Meaning, to this day, I only turn knobs on my synths without *any* pushing nor using for example one finger, letting the length of finger be surface the knob rolls on length of, ever so slightly creating an off-center-axis pressure that possibly could cause undue friction and failure or inaccuracies. I will say that having since acquired a waldorf Q synth rack with all those knobs, those optical pots are the most smooth and solid have twiddled to date. Interested in viewing pics of the JB Wield fix and how you managed to keep the stuff from oozing into scary places!?! I thought sharing my training of treating our synth's pots/knobs as if they were same military spec'd equipment could perhaps help others. Have seen people treating pots/knobs rather harshly on YouTube with exception of Elektron gear, whose multi-function push/turn pots are made to have already a slight 'wear-in tolerance'. Recently purchased an used Elektron MonoMachine SFX60 Mk1 (first generation) for external sequencing experimentation and firstly thought had 8 bad pots but Elektron quickly replied and have since read on their forum that their pots are made to allow for this 'off-axis' human twiddling. (deep machine by the way). Relevant rant over! |
Step 1.
Does your cat look like this?  or like this?  No? Then rub it on its chin, between the ears, or on its belly until it starts smiling, then continue to step 2. Step 2. Place JB weld on either side of the pots like in the picture below. 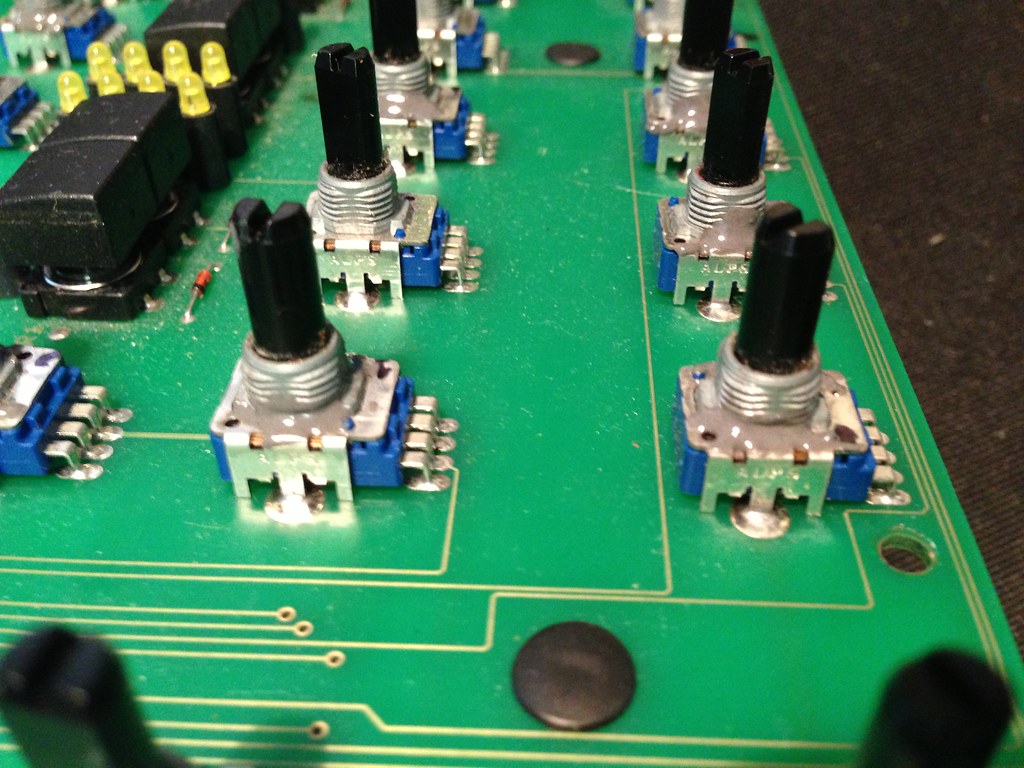 less is more, but less than I have pictured is less in a bad way. more than I have is probably alright for a B/classic, as the threaded portion does not even make it to the faceplace. two out of four corners of each pot will have an empty hole, and the other two will have blue plastic knobs poking out. I am not sure how much JB weld you can pour into those holes before the pot is garbage, but unless you are good with a soldering iron, I recommend being careful. a few of my pots were had a bit seep into those holes, but I wasn't to concerned because I've been repairing electronics for a decade anyhow. Only one of the pots pictured was solid enough to not bother JB welding. I applied it to the pots like in the above picture (both sides, not just the pictured side) to about 75% of my pots, and they are solid as new. How sturdy is this fix? Well, as long as you mixed the JBweld properly and gave it a good 24 hours to cure, it should outlast the pots themselves, based on my experience with this stuff (I've gone through probably five litres of this stuff over the years). Step 3. Why does this happen? 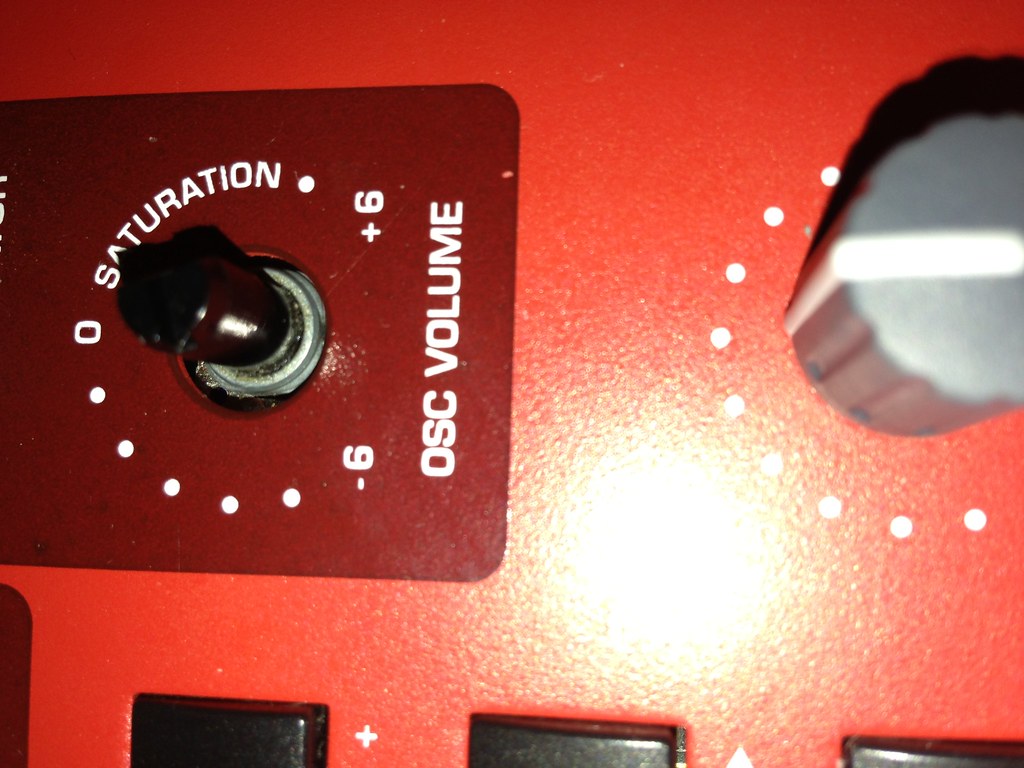 Well, two main reasons. One, is that the metal part you can see here should protrude through the faceplate, and a washer and a nut should adhere it to the faceplace for added rigidity. If your pot is really shaky, pop off the knob and move it back and fourth. if th black plastic post moves but there is ABSOLUTELY ZERO play in the threaded metal part you can see in the picture, then this JBweld job won't do crap, and the plastic components of the pot are worn out. If the threaded cylinder does have any sort of play, it is because it wasn't mounted to a sturdy surface in the first place which is definitely access' fault. This is probably a fault you will find in other modern synths as well, and you can check to see if this design defect affects any synth by simply pulling off the knob and looking in. Is the inside of the shaft threaded? it was almost positively designed to be mounted around the collar. The second complaint is the plastic posts used in these pots. they definitely skimped out on the pots for these, and for an extra $5 worth of parts could have installed pots with a metal post. If you treat your knobs properly and the threaded collars were properly locked down, these pots would last a reasonable amount of time, so this minor complaint is greatly surpassed by the first one. If I ever break a pot completely, I'm going to order a few sturdier metal pots to experiment with, but I'm pretty sure my fix will outlast me. Step Namnibor. Please continue treating electronic devices with respect, like most people should but nobody does. It is usually pretty obvious (to completely biased me) how mechanical things are intended to be treated, so anything that twists but doesn't have any functionality by rocking should be turned, not rocked. It was after getting my virus back from lending it out that I had to fix half the pots in the first place, but to be fair, they wouldn't have done this if they were properly mounted in the first place. Again, you can see if this common design flaw exists in any knobbed thing by popping off the knob itself and seeing if the collar is threaded (most are), and if there is a nut holding that collar to something rigid as per its design. Step Future Plans. I'm not sure how you fellas feel about mods, but this summer's mod project is a pair of TOTALLY FUNKY ears for this sucker. left ear will have a pitch/mod wheel and a rather basic 16 step sequencer, and the right ear will have a one or two octave keyboard in the style of an accordion. if people on here are into that sort of thing, I'll start a thread when I'm starting on it. Step Other Questions. If I'm forgetting something or not specific enough about something, let me know. |
This may seem a bit ~*mad*~ but perhaps an even easier and pragmatic way to *keep* the pot stems upright ALL the time, no matter what:
Without even having to open-up the Virus, providing one's pots are all okay or have been fixed per this great post--could one just remove only the knobs and place simple black anodized flat washers that are small enough to where one would not see it once knob is replaced, making sure the center hole in washer *just fits* diameter of encoder/pot stem, and affix flat washer to flat Virus fascia, centered, thus not ALLOWING any side to side play in first place? Plastic washers can even be found if friction of metal against plastic stem is a worry and super glue GEL would spread less and on that note, less of course is best, making sure it's adhered by four equal points. The tubes allow you to have needle-sized applicator. Am considering doing this as a preventative measure since both the KB and KC are far out of warranty and in event some day it were necessary to open the hood and the tolerance would not allow this as freely, they would be simple enough to remove/replace. However, even if the washer's inner circumference is not *right on shaft*, having less tolerance for eventually moving can only help. This would give stability but cannot stress how important it is to not use undue downward pressure on ANY encoder/pot as well to avoid calamity. Lastly, never loan your Virus out to anyone in first place:rolleyes: ! Feedback and criticism on this caffeinated A-ha Moment is most welcome!! |
i've opened up an INDIGO 2 and two INDIGO 1's.
i found my current INDIGO 1 also has the toothpick but the other INDIGO's did not. weird!  |
Quote:
did you find that popping them off and reinstalling resolved this issue at all? (that is if you had loose buttons like i do) |
Quote:
You could try flipping off the caps and replacing them first, make sure they're on correctly. Use a plastic spatula or something that is broad but isn't sharp to lever them out. Otherwise if you are having trouble with the button switches in use, if they're erratic or not very responsive or similar, you may need to replace them (involving de-soldering and replacing from the PCB). |
Quote:
Would you happen to know the best method of cleaning the button switches? I'm having the same problem and am not quite ready to re-solder my Virus KC and source new parts. I've seen a lot of different tutorials saying to use contact cleaner, to not use contact cleaner, to use rubbing alcohol, etc... |
Quote:
|
Quote:
I got my pots from Access Music's hardware branch in Germany - Synthesizer Service - so I assume they also know which switches were used. Send them an email and they may be able to advise further. |
Hey, thanks a lot for the images. Really helpful.
I just have replaced the LCD on my Indigo 2 and was not sure if the disassemble procedure is the same. I can confirm it is nearly identical. Small difference is the keyboard where the strip is connected to the left instead the middle. If one want to change just the display you don't need to disassemble the keyboard, though. But you still have to disassemble the sides. Attention on the wireing of the display, two of the cables on the ribbon connector are "twisted". BTW. I don't had toothsticks but a lot of hot glue on some connectors. |
Hi,
I know this is a quite old post but is there a chance for high res photos of Indigo 1 main pcb where I could check capacitors polarisation? I think I messed up with mine when I was replacing all due to LCD starting to fail. Thanks in advance. Cheers |
I'll open up my Indigo v1 and take a photo for you some time tomorrow when I get spare time.
|
Thanks Timo,
I will owe you a big one. Cheers |
Ok, I don't do this for everyone ;) but I disassembled my Virus and desoldered the mainboard to get a good look at the caps, not only to get their polarity but the values too. Some of the caps are an arse to read as they are closely mounted and largely obscured.
Polarities are shown as red - for negative, green + for positive. Values are in yellow beside each cap. Make sure you zoom into the photo after you display it full-size, if necessary, as it may be higher resolution than your monitor can display. It's 3264 x 1922 pixels.  Or click: http://www.infekted.org/virus/files/...digo1-caps.jpg Any problems/queries let me know. |
Timo - you are the absolute star with this. I do have a slightly older version - your is 4.0 - mine is 3.2, however, capacitors locations, values and polarity is the same. I just did proper check with what I currently have and unfortunately for me replacing capacitors and two 5V regulators didn't do the trick.
One thing I'm finding a little bit off is when I measure on 2575 regulator voltage between output - which is 2 pin - and the ground doesn't show me 5volts but something like 4.92 ... I know this will be a long shot, but would that be a case? Timo - once again - thank you. Tell me where to send a case of beer :-) Cheers |
Soldered and reassembled the Indigo so am unable to measure, and I don't know a great deal about regulators, but 4.92V is very close to 5V? It's only 0.08V difference.
Just looked up the tech specs of LM2575 on Google and shows it has a 4% tolerance rating, which would give it a range of ±0.2V at 5V... so you might expect anything from 4.8 to 5.2V? |
Hi Timo,
Thanks for the heads up. I checked that too. I think there must be some other issue. My Indigo electronics seems to lose current. When I'm switching it on and measure the voltage on 5V volt regulators it stays the same but after few seconds it just dying. There is one capacitor actually I overlooked - waiting for delivery, but my hopes slowly varnishing. Thanks again - Matt |
You mentioned losing current, have you tried a different PSU? Just a thought.
There'll always be a transient when you switch the Virus on/off, though, as you can probably tell when you accidently turn your Virus on after the speakers. (*thWUMP!*) |
Hello Timo,
Excellent job documenting the disassembly of your Indigo. Seeing the fruits of your labor was very helpful in extracting the original PUT POWERTECH AD2512A PSU from my TI keyboard after the PSU recently failed. I've since identified and ordered the MEAN WELL GST25B12-P1J as a replacement PSU due to the GST25B12-P1J having virtually the same specifications and physical dimensions as the original AD2512A. Thanks again the enlightening post. |
ah! so detailed.
I had to pull apart my old micro-x to fix a common fault with the pitch bend. I didn't finish the full task in one day, and returning to an already opened synth, it was a challenge to decipher which sized screws went where... I found some youtube videos and blog posts of people repairing it, I eventually figured it out, but I longed for a post as detailed as this, for that synth, in that moment! Good work! |
| All times are GMT. The time now is 08:06 PM. |
Powered by vBulletin® Version 3.6.4
Copyright ©2000 - 2025, Jelsoft Enterprises Ltd.
Copyright ©2002-2022, Infekted.org